
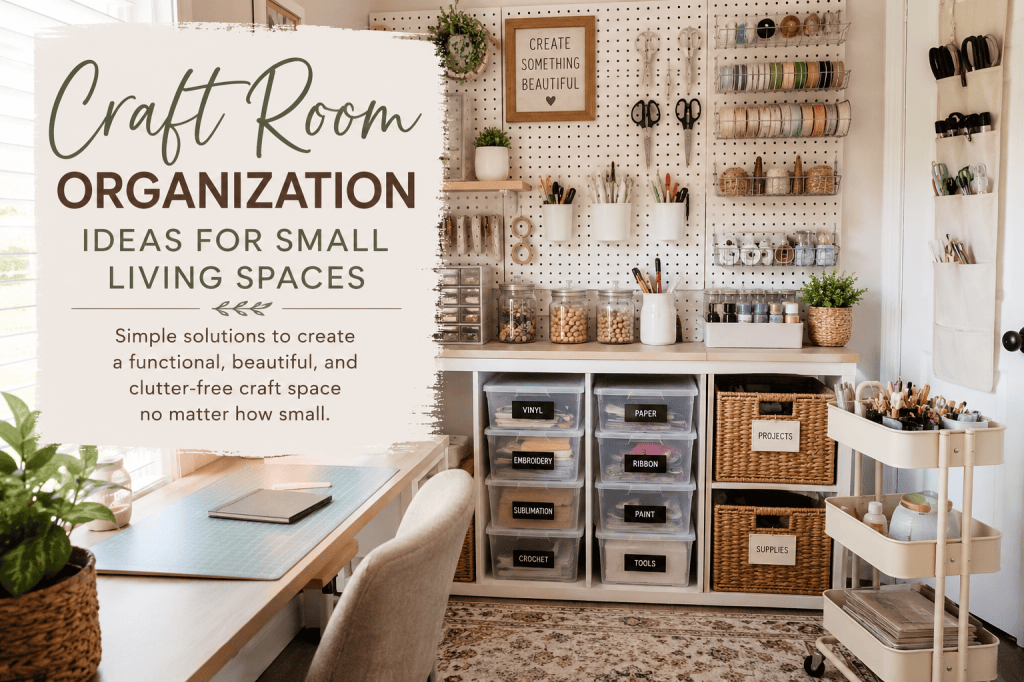
How to create an organized, functional craft space—even when you don’t have an entire room to dedicate to crafting.
If you love crafting but don’t have a large craft room, you’re definitely not alone.
Whether you’re working with a small bedroom, apartment corner, multipurpose room, closet, or even a compact RV living space, you can create a craft area that is organized, functional, and enjoyable to use.
The secret isn’t having more storage.
It’s learning how to make the most of the space you already have.
With a few simple organization strategies, even a tiny craft area can hold a surprising amount of supplies without making your entire living space feel like a craft store exploded.
Start With What You Actually Use
Before buying storage containers, take everything out and sort your craft supplies.
Create three basic categories:
- Use regularly – supplies you reach for often
- Use occasionally – seasonal or specialty supplies
- Don’t use – items you bought with good intentions but haven’t touched
Be honest with yourself.
If you haven’t used something in several years and don’t have a specific project planned for it, it may be taking up valuable space that could be better used for supplies you actually enjoy.
Small-space organization works best when everything earns its place.
Think Vertically
One of the biggest mistakes people make when organizing a small craft space is concentrating only on floor and tabletop storage.
Look up!
Your walls can provide valuable storage without taking up precious floor space.
Consider using:
- Pegboards
- Wall-mounted shelves
- Hanging baskets
- Magnetic strips
- Rail systems
- Small wall-mounted bins
- Hooks
- Narrow shelving units
A pegboard can be especially useful because the arrangement can be changed as your crafting needs change.
Keep your most frequently used supplies within easy reach and place less-used items higher up.
Use the Back of Doors
Don’t overlook the back of a closet, cabinet, or room door.
An over-the-door organizer can hold surprisingly large amounts of small craft supplies.
Use pockets for things such as:
- Scissors
- Ribbon
- Glue
- Paintbrushes
- Vinyl tools
- Embroidery supplies
- Crochet hooks
- Small notebooks
- Crafting tools
This is particularly helpful when you don’t have enough drawer space.
Choose Storage That Does Double Duty
In a small living space, every piece of furniture should ideally serve more than one purpose.
Instead of adding another bulky piece of furniture, look for storage that can also function as:
- A work surface
- A side table
- A bench
- A nightstand
- A desk
- A display area
A small rolling cart is another excellent option.
You can keep your current project on the cart, roll it next to your workspace when you’re crafting, and move it out of the way when you’re finished.
Create a Dedicated Craft Station
Even if you can’t have a complete craft room, try to establish a designated crafting zone.
It could be:
- One side of a desk
- A section of a dining table
- A closet
- A rolling cart
- A small cabinet
- A corner of a bedroom
- A fold-down table
The important thing is having a place where your supplies belong.
When everything has a home, cleanup becomes much easier.
And when cleanup is easier, you’re much more likely to actually put your supplies away.
Use Clear Containers for Small Supplies
Small craft supplies have a special talent for becoming clutter.
Buttons, beads, embroidery floss, vinyl scraps, beads, charms, ribbons, and other tiny materials can quickly become one giant mystery box.
Clear containers make it easier to see what you have without opening every container.
For frequently used supplies, consider small stackable containers or divided organizers.
For less frequently used supplies, larger labeled containers can work well.
A Simple Labeling Rule
Don’t make your labels complicated.
Use labels that tell you exactly what is inside.
For example:
Ribbon
Buttons
Embroidery
Vinyl
Crochet Hooks
Sublimation Supplies
Seasonal
The goal is to find what you need quickly—not create a museum-quality filing system.
Organize by Craft, Not Just by Supply
If you enjoy several different crafts, organizing everything by item type can sometimes make projects harder to start.
For example, instead of keeping all of your scissors together, all of your adhesives together, and all of your tools together, you might create project-specific areas.
You could have:
Crochet
- Yarn
- Hooks
- Stitch markers
- Patterns
Sublimation
- Blanks
- Sublimation paper
- Heat-resistant tape
- Designs
- Tools
Embroidery
- Thread
- Needles
- Hoops
- Fabric
- Patterns
This approach makes it much easier to grab what you need and start a project.
Keep Your Current Project Together
One of the easiest ways to create craft clutter is to have multiple projects scattered throughout your living space.
Instead, give each current project its own container.
A basket, fabric bin, zipper pouch, or small tote can hold everything needed for that project.
When you’re ready to work, simply pull out the project container.
When you’re finished, everything goes back inside.
This is especially useful if your craft space also serves another purpose.
Don’t Forget Under-the-Bed Storage
If your living space doesn’t have enough closet or cabinet storage, look underneath the bed.
Low-profile containers can be perfect for:
- Fabric
- Yarn
- Seasonal decorations
- Scrapbooking supplies
- Finished projects
- Extra blanks
- Specialty tools
Use labeled containers so you don’t have to pull everything out just to find one item.
Make Your Craft Space Visually Calm
Organization isn’t only about functionality.
Your craft area should also make you want to spend time there.
When space is limited, too many colors, patterns, containers, and objects can make the area feel visually chaotic.
Try keeping your storage containers relatively consistent.
Earthy neutrals, natural baskets, wood tones, cream, beige, taupe, and muted colors can create a calmer appearance while still allowing your crafts themselves to provide pops of color.
Remember:
Your craft supplies can be colorful. Your storage doesn’t have to be.
Create a “Finished” Area
If you make handmade items, you probably have finished projects waiting to be photographed, packaged, gifted, sold, or put away.
Give those items their own designated space.
A small shelf, basket, cabinet, or storage bin can prevent finished projects from becoming clutter throughout your living area.
If you sell your crafts, consider separating:
Supplies → Current Projects → Finished Products → Packaging
That simple system can make a small workspace feel much more professional.
Use a “One In, One Out” Rule
Small spaces have a physical limit.
Eventually, adding more storage won’t solve the problem.
When you purchase a new craft supply, ask yourself:
Where will this live?
If you don’t have an answer, you may not actually need the item yet.
A simple rule can help:
One new category of supplies comes in, and something unused goes out.
You don’t necessarily have to throw anything away. Consider donating usable supplies, selling them, or giving them to another crafter.
Give Yourself a Five-Minute Reset
You don’t need to spend an entire Saturday reorganizing your craft area.
At the end of each crafting session, spend five minutes resetting the space.
Put tools away.
Return supplies to their containers.
Throw away scraps.
Put unfinished projects into their project containers.
Wipe down your workspace.
Five minutes now can save you from a much bigger mess later.
Small-Space Craft Organization Doesn’t Have to Be Perfect
Perhaps the most important thing to remember is this:
Your craft space doesn’t have to look like Pinterest.
It needs to work for you.
If you craft at the kitchen table, that’s okay.
If your supplies live in a rolling cart, that’s okay.
If your craft room is actually half of a bedroom, that’s okay.
If you keep your supplies in labeled containers underneath your bed, that’s okay too.
The goal isn’t to create the perfect craft room.
The goal is to create a space where you can easily find your supplies, enjoy your hobbies, and put everything away when you’re finished.
And that is something you can accomplish—even in a very small living space.
A Simple Small-Space Craft Organization Formula
If you’re not sure where to begin, use this simple system:
1. Declutter
Remove supplies you no longer use.
2. Categorize
Group similar supplies or organize by craft.
3. Contain
Give each category a designated container.
4. Label
Make everything easy to find.
5. Go vertical
Use walls, doors, and other overlooked spaces.
6. Create project containers
Keep current projects together.
7. Reset daily
Spend five minutes putting everything back.
That’s it.
You don’t need a huge craft room.
You need a simple system that works within the space you already have.
Final Thought
A small living space doesn’t mean you have to give up the hobbies you love.
With thoughtful storage, intentional organization, and a little creativity, you can create a craft area that is both functional and beautiful—without taking over your home.
Sometimes, making life simpler isn’t about having more space.
It’s about making better use of the space you have.
Save This Idea for Later
Love simple organization ideas for small spaces?
Pin this article to your Craft Room Organization, Small Space Organization, or Home Organization board on Pinterest so you can come back to it when you’re ready to reorganize your craft supplies.
This post may contain affiliate links. If you purchase through one of the links, I may earn a small commission at no additional cost to you. I only recommend products that I believe can be useful to my readers.
 Life Made Simple
Leave a comment