
Affiliate disclosure: This post contains affiliate links. I may earn a commission from qualifying purchases at no additional cost to you.
When I first started sublimation, I quickly discovered that there is a lot of information out there.
Which printer should you buy? What ink works? Which paper? Do you need a special heat press? Why did the design look dull when it came out of the printer? And why did that beautiful white part of the design completely disappear?
After more than four years of creating sublimation projects, I’ve learned that you don’t need every gadget and supply you see online.
You need a reliable basic setup, a few good-quality supplies, and an understanding of how sublimation actually works.
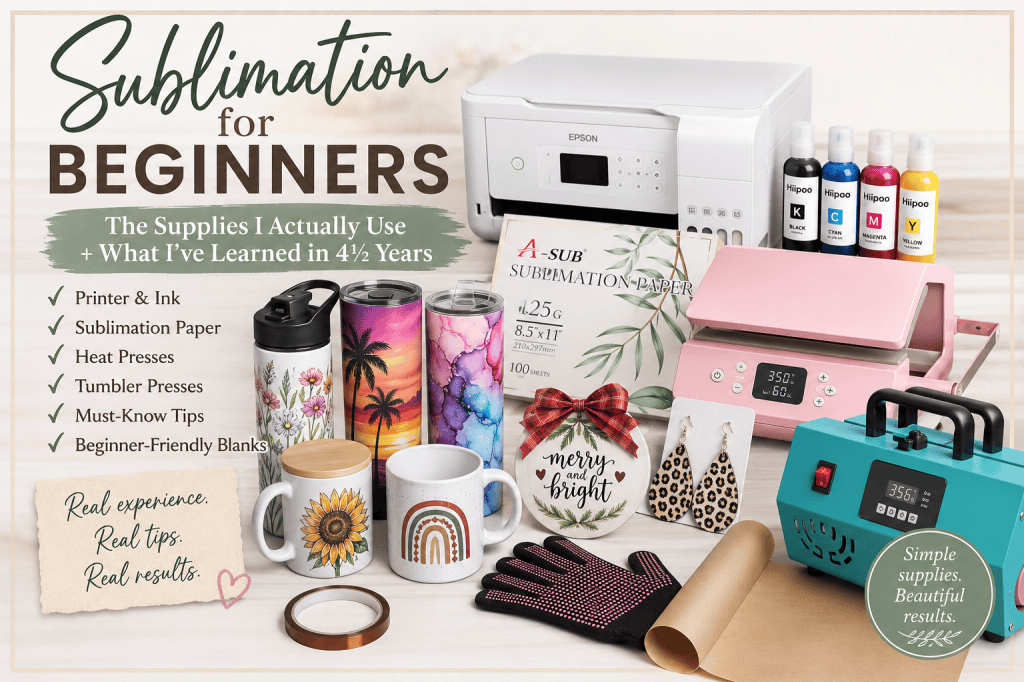
So rather than giving you a giant list of things I think you should buy, I’m going to show you the sublimation supplies I actually use, what has worked for me, what hasn’t, and what I would choose differently if I were starting over today.
First: What Is Sublimation?
Sublimation is different from putting vinyl, a sticker, or another material on top of an item.
During the heat-transfer process, sublimation dye turns into a gas and bonds with polyester fibers or the polymer coating on a sublimation-compatible blank.
Once the item cools, the design is essentially embedded into the compatible material rather than sitting on top of it.
That’s why a properly sublimated design doesn’t have the raised or sticker-like feel you might get with some other decorating methods.
But that process also creates some limitations that are important to understand before you start buying supplies.
⚠️ One of the Most Important Things to Know: Sublimation Doesn’t Print White
SUBLIMATION INK DOES NOT SHOW UP WELL ON DARK COLORS.
A standard sublimation setup like mine uses cyan, magenta, yellow and black ink.
There is no white ink.
If your design contains white, your printer essentially leaves that part of the design unprinted. The white you’re seeing on the finished product is usually the white surface of the sublimation blank showing through.
That means a white design isn’t going to magically appear on a black shirt or dark tumbler.
But that doesn’t mean you’re limited to white substrates.
I’ve used designs successfully on colored materials such as gray, cream, blue, red, green and hot pink. The key is choosing a design that has enough contrast with the background.
An all-black design, for example, can work beautifully on many colored substrates. Bold colors can work, too, depending on the color underneath them.
My Trick When White Doesn’t Work
Sometimes I have a design that includes white, but the color of my substrate doesn’t work well with leaving that portion unprinted.
Instead of using pure white in the design, I’ll sometimes change it to an off-white, cream or another very light coordinating color.
Because that shade contains actual color information, the printer can print it.
Just remember that sublimation dye isn’t opaque. The substrate underneath still affects the finished color, so this technique works best on lighter-colored materials.
Polyester Content Matters
Sublimation dye needs something compatible to bond with.
For fabric projects, that generally means polyester.
The higher the polyester content, the more vibrant the finished design will typically be. In my experience, materials containing less than about 50% polyester don’t hold that same bright sublimated color.
Traditional cotton isn’t ideal for direct sublimation.
There are sublimation coating sprays marketed for cotton and other materials, and they can give you more options to experiment with. However, results can vary, and I wouldn’t make that your very first sublimation project.
If you’re a beginner, give yourself the best chance of success. Start with a white or light-colored, high-polyester fabric or a blank specifically manufactured for sublimation.
The Sublimation Supplies I Actually Use
Now let’s get into my actual setup.
My Sublimation Printer: Epson EcoTank ET-2850
I’ve been using an Epson EcoTank ET-2850 for sublimation for approximately 4½ years. The Epson EcoTank ET-2800 is also a great choice.
And yes—I’m still using the same printer.
One reason I’ve liked it is its size. I work in a small space, and the ET-2850 doesn’t require an enormous dedicated work area.
It also connects through Wi-Fi, and the refillable EcoTank system makes keeping it supplied with sublimation ink relatively inexpensive. The ink lasts a long time for the type and volume of projects I make.
The Downside: Don’t Let It Sit Too Long
If I don’t use my printer for a week or two, I sometimes need to run a nozzle-cleaning cycle.
Fortunately, mine typically recovers pretty quickly.
I’ve also seen other sublimation users report problems related to printer or software updates. I personally haven’t experienced that issue, but it’s something you may encounter mentioned in sublimation communities.
The Other Limitation: Paper Size
The ET-2850/2800 prints up to 8.5 × 11 inches.
That isn’t a problem for most of my projects, but larger designs sometimes require a little creativity.
If I’m making something larger than a single sheet can accommodate, I can split the design between sheets, carefully line them up and tape them together from the reverse side before pressing.
⚠️ If You’re Buying an EcoTank for Sublimation, Read This First
The Epson ET-2850/2800 isn’t sold as a dedicated sublimation printer.
If you purchase a new EcoTank specifically to convert for sublimation, my recommendation is:
Do NOT fill it with the regular printer ink first.
I started with sublimation ink in mine.
If regular printer ink has already been placed in the tanks, it needs to be thoroughly removed before converting the printer to sublimation.
Also, don’t assume that any bottle advertised as EcoTank-compatible is sublimation ink.
You need ink specifically formulated for sublimation.
What About the Warranty?
This is something worth knowing before you convert a printer.
Using third-party sublimation ink isn’t the use Epson designed the ET-2850 for, and Epson’s warranty excludes certain damage caused by inks or ink-delivery systems other than the Epson ink system designed for the printer.
So understand the warranty implications before deciding to convert a new EcoTank.
Would I Buy the ET-2850 Again?
Based on my experience, yes.
For a beginner—especially someone working in a smaller craft space—it has been a compact and dependable sublimation printer for me.
The Sublimation Ink I Use: Hiipoo
I use Hiipoo Sublimation Ink in my ET-2850.
The four-color set contains black, cyan, magenta and yellow, and I’ve found the EcoTank system economical because I don’t have to refill it constantly.
And this brings us right back to that important lesson from earlier:
There is no white ink in this setup.
Design accordingly.
Also, don’t panic if your sublimation print doesn’t look as vibrant on paper as you expected. Sublimation designs often look considerably different before they’re pressed. Heat is part of the process that produces the final result.
My Sublimation Paper: A-SUB 125g
The paper I continue to purchase is A-SUB 125g Sublimation Paper.
I’ve bought it multiple times, and I’ve found a little money-saving trick that works well for me.
Instead of buying 8.5 × 11-inch sheets, I buy the 11 × 17-inch size and cut the sheets in half.
That gives me two approximately 8.5 × 11-inch sheets from every large sheet and works perfectly with my printer.
Make Sure You’re Printing on the Correct Side
With the A-SUB paper I use, the two sides are easy to distinguish once you know what you’re looking for.
Print on the more textured, solid-color side.
The back is slicker and has the A-SUB branding printed across it.
It’s a tiny detail, but printing an entire beautiful design on the wrong side of your sublimation paper is not the kind of lesson you want to learn repeatedly!
⚠️ Always Mirror Your Design
As a general rule:
Always mirror your sublimation design before printing.
The printed transfer is placed face-down against your substrate. Mirroring the design before printing means it will appear in the correct orientation after transfer.
Technically, there are times when it wouldn’t matter. A perfectly symmetrical image without words, for example, may look exactly the same either way.
But I don’t like relying on remembering when it matters and when it doesn’t.
I make mirroring part of the normal process.
Design → Size → Mirror → Print → Press
This is especially important for names, words, dates, numbers, logos and directional graphics.
What Software Do I Use?
I’ve tried several different programs over the years, but I’ve relied heavily on Microsoft Publisher for creating and laying out my sublimation designs.
It allowed me to size things precisely and arrange designs on the page the way I wanted them.
Unfortunately, Microsoft is retiring Publisher in October 2026.
The good news?
I’ve discovered that PowerPoint can accomplish much of what I was doing in Publisher, so that’s what I’m transitioning toward.
If you’re starting sublimation now, I wouldn’t recommend learning Publisher only to immediately need a replacement.
Use PowerPoint or another design program you’re comfortable with that allows you to control your design size, placement and printing.
The software matters less than knowing how to use it correctly.
Heat Tape: Don’t Skip It
Heat-resistant tape isn’t just there to make your project look tidy before it goes into the press.
It keeps your design from moving.
If your transfer shifts during pressing, you can end up with ghosting—a blurry or shadow-like duplicate around parts of your design.
Secure your transfer well enough that it stays exactly where you positioned it during pressing.
Why I Always Use Butcher Paper
Butcher paper is one of those inexpensive supplies that can save you from ruining both your current project and your next one.
When sublimating a shirt, I put butcher paper inside the shirt between the front and back layers.
This prevents sublimation ink from bleeding through the fabric and transferring onto the other side.
I also put butcher paper over the project to protect my heat press.
Why?
Because if sublimation dye transfers onto the heat press, it can potentially be reactivated by heat the next time you use it.
Then part of yesterday’s project may suddenly appear on today’s.
Beginner rule: Protect anything you don’t want sublimation ink to reach.
And don’t assume butcher paper is clean simply because you can’t see ink on it. If I think it may have picked up sublimation dye, I’d rather replace it than risk transferring that dye to another project.
Choosing a Heat Press
The Heat Press I Started With
I started with a VEVOR 12 × 15-inch 5-in-1 360° swing-away heat press.
It has worked, and I’ve made plenty of projects with it.
A swing-away press moves the upper heating platen out to the side so you can access the lower portion and position your project.
The downside?
It needs room to swing.
That’s something I appreciate much more now that space matters to me.
What I’d Buy Today
I’ve also had the opportunity to use a VEVOR 15 × 15-inch press with a slide-out lower tray at my friend Amie’s house.
If I were starting over, that’s the style I’d choose.
Instead of swinging the heating element out into your workspace, the bottom tray pulls toward you. You position the item, slide the tray back underneath the press and press your project.
For me, it feels cleaner and is a much better use of limited space.
I’d also choose a 15 × 15 pressing area over my original 12 × 15 if my available space and budget allowed.
What I’d do differently: I wouldn’t replace a perfectly functional swing-away press just because another style exists. But if I were purchasing my first one today, I’d choose a 15 × 15 press with a slide-out lower platen.
What I Use for Tumblers
My current tumbler press is a compact RIACHROW tumbler heat press.
For my setup, its biggest advantage is size.
It’s great when you’re working in a small space and handles common tumbler and mug sizes well.
Its limitation is exactly what you’d expect from a compact press: not every tumbler size and shape fits it.
Once you start experimenting with different drinkware, that can become frustrating.
What I’d Buy If I Replaced It
If I were replacing my tumbler press today, I’d lean toward an HTVRONT automatic tumbler heat press.
I like the increased ability to adjust to the project rather than being as limited by the fixed size of my current press.
Again, this is one of those things I understand differently after years of crafting.
When you’re first starting, you may think you’ll only make one kind of tumbler.
Then you discover all the other blanks.
And suddenly you want to press everything.
Do You Need a Sublimation Oven?
Probably not when you’re first starting.
People who make a higher volume of tumblers or want to work with certain dimensional blanks may prefer a dedicated sublimation oven.
But consider your situation first.
An oven requires adequate counter space, and excellent ventilation is important when you’re heating sublimation materials and coatings.
You’ll also potentially use additional supplies such as shrink wrap.
And I would keep any oven used for sublimation and crafting completely separate from anything used for food preparation.
For someone making occasional tumblers, a dedicated tumbler press may be the simpler starting point.
If your production volume grows later, then you can decide whether an oven makes sense.
My Favorite Sublimation Blanks for Beginners
Now for the fun part!
You don’t need to start with complicated projects. In fact, I’d recommend the opposite.
Choose projects that give you some room to learn.
20 oz. Water Bottles — My Most Versatile Pick
The Joyclub 20 oz. sublimation water bottles have been some of the most versatile blanks I’ve used.
They’ve also been in high demand in my own family—even my grandkids (especially Paislynn & Rylan) like them!
They’re practical, easy to personalize and work for both adults and kids.
Once you’ve gotten comfortable with drinkware, there are endless possibilities for designs.
Coffee Mugs — Excellent for Learning
Coffee mugs are one of my favorite recommendations for someone learning.
Why?
Your design doesn’t necessarily have to meet itself perfectly around the back.
With a seamless full-wrap tumbler design, alignment can become part of the challenge.
A mug allows you to practice sizing, positioning, pressing and color without worrying as much about matching two ends of a design perfectly.
Ornaments — Start Small and Simple
If you want a smaller beginner project, sublimation ornaments are great.
They’re easy to handle, don’t require a huge design and are perfect for personalized gifts.
They’re also a nice way to practice before moving onto more expensive blanks.
Sublimation Earrings — Choose Your Design Carefully
Earrings are fun, but they can be a little trickier than they look.
When you’re trying to make two earrings match exactly, placement matters.
My solution?
Use abstract designs.
An abstract pattern doesn’t necessarily have to line up identically on both earrings. Slight variations can actually make the finished pair more interesting.
That lets you enjoy the project without making yourself crazy trying to position two tiny designs exactly the same way.
What I’d Tell Someone Starting Sublimation Today
After 4½ years, I wouldn’t tell a beginner to buy every accessory, every blank and every machine they see.
I’d tell them to learn the process first.
Start with a reliable printer, true sublimation ink, good sublimation paper, heat-resistant tape, butcher paper and a press appropriate for the projects you actually want to make.
Then choose forgiving blanks.
A coffee mug, ornament or simple water bottle gives you room to learn about temperature, pressure, timing, placement and color without starting with the most complicated project you can find.
You’ll make mistakes.
I’ve certainly learned things along the way.
But that’s also how you discover the little tricks that eventually make sublimation feel much less intimidating.
And before long, you’ll probably be looking at completely ordinary objects and wondering:
“Can I sublimate that?”
Welcome to sublimation. 😊
Want More Simple Crafting Help?
I’ll be adding more of my favorite sublimation projects, supplies, troubleshooting tips and small-space crafting ideas here on Life Made Simple.
If you’re just getting started, you may also want to read:
→ Beginner Sublimation Projects You Can Make in Under 20 Minutes
→ Craft Room Organization Ideas for Small Living Spaces
Practical guidance for health, home, and everyday life.

 Life Made Simple
Leave a comment